

Table of Contents
- Why an Integrated Under Stair Pet House Beats a Freestanding Crate
- Under-Stairs Dog House Ideas That Work in Real Homes
- Built-In Dog Bed Under Stairs: Getting the Sleeping Area Right
- DIY Under-Stairs Dog House: A Step-by-Step Build Plan
- Under-Stairs Pet Room With Storage: Combining Comfort and Function
- Ventilation, Temperature, Lighting and Safety Checklist
- Measuring Stair Geometry and Cleaning Under-Stair Pet Areas
- Conclusion: Turning an Awkward Space Into a Pet-Friendly Feature
- Frequently Asked Questions
Last Updated: October 8, 2026
Why an Integrated Under Stair Pet House Beats a Freestanding Crate
An integrated under stair pet house turns the dead space beneath your staircase into a proper room for your dog, and it solves a problem a freestanding crate never will. A crate sits in the middle of the room, blocks the walkway and gets shoved into a corner when guests arrive.
At Finest Furniture Studio, we fit storage into sloping ceilings and awkward corners every week. The under-stair zone is the single most wasted area in most homes.
Here is why built-in wins:
- It removes clutter instead of adding furniture
- It matches your hallway joinery, so it looks intentional
- It gives your dog a den that feels secure
- It frees up floor space in small homes
Below, we break down the best styles, the sleeping area setup, a full build plan and the safety checks most guides skip.
Under-Stairs Dog House Ideas That Work in Real Homes
The best under-stairs dog house ideas fall into two families: enclosed builds that look like furniture, and open designs that blend into the room. Both work. The right choice depends on your dog’s size and how much of the staircase you are willing to lose.
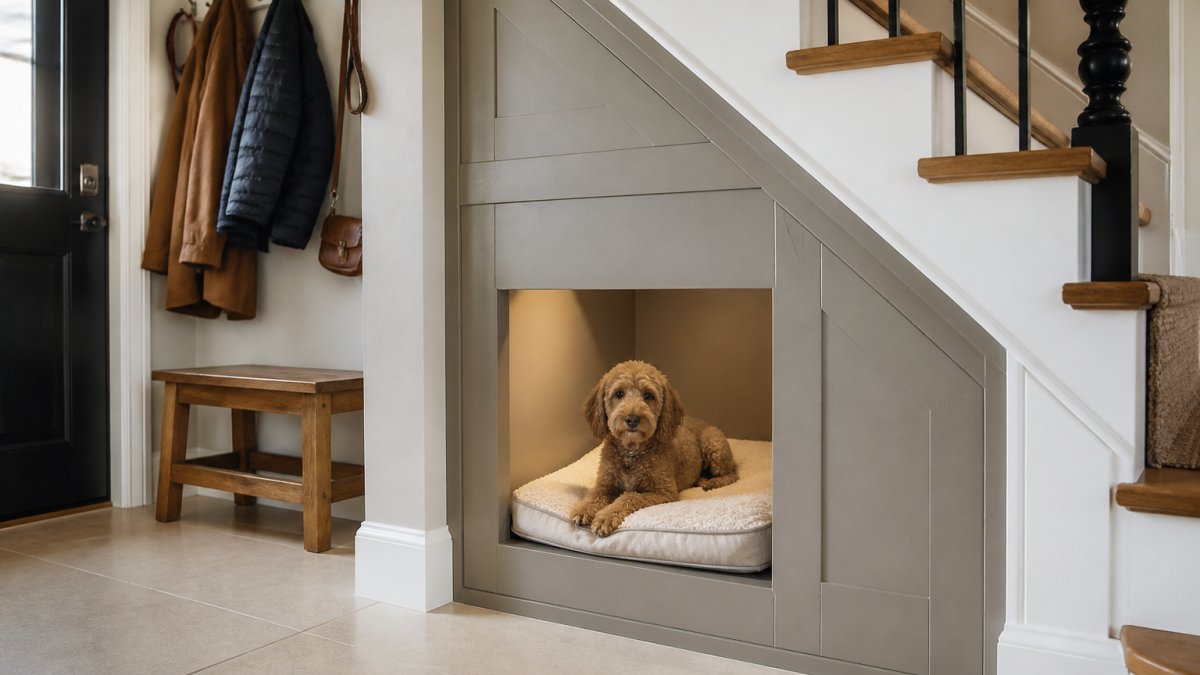
Built-In Kennel Designs and Dog-House-Style Builds
A built-in kennel is a boxed enclosure framed into the staircase, usually with a sloped top that follows the stairs above it. Panelled doors hide the interior when you want quiet. A dog house-style build does the same job but reads as a little house, with a pitched front and a cut-out entry.
Both suit a small dog well. For a large dog, check head height at the tallest point before you commit.
Open-Concept Pet Spaces and Cozy Nook Conversions
An open-concept pet space skips the door entirely. You get a cozy nook with a raised platform, a washable cushion and a low lip to keep bedding in place. These conversions cost less and feel less enclosed, which suits anxious dogs who dislike closed doors.
Built-In Dog Bed Under Stairs: Getting the Sleeping Area Right
A built-in dog bed under stairs works best when the base sits slightly off the floor. A raised platform of around 100mm keeps bedding away from cold floors and lets air move underneath.
Size the sleeping area to your dog’s full stretch, not their curled-up size. Measure nose to tail while they lie flat, then add roughly 150mm on each side. A bed that is too tight causes restless nights and pressure on joints.
- Use a removable, machine-washable cover
- Choose a firm orthopaedic foam for older dogs
- Add a low lip at the front to stop bedding spilling out
- Keep the entry opening at least 50mm wider than your dog’s shoulder width
DIY Under-Stairs Dog House: A Step-by-Step Build Plan
A DIY under-stairs dog house is a weekend project if the space is already clear, and a two-weekend job if you need to move wiring or boxing. Plan the layout before you buy a single board.
Total time: 2 weekends
Difficulty: Intermediate
Step 1: Clear and Inspect the Space
Empty the cupboard and check what is fixed inside. Look for a gas meter, electricity meter, consumer unit, stopcock, alarm cabling or a boiler flue. Anything that must stay accessible changes the design, so identify it now rather than after the frame is up.
Step 2: Measure the Stair Geometry
Measure the clear height at the front, middle and back of the opening, and the width at floor level and at the lowest point of the slope. The shallowest height governs the whole design. Allow a minimum of 100mm clearance above your dog’s head at the tallest point they will use.
Step 3: Build the Frame
Fix treated timber battens to the floor, the side walls and the underside of the stairs using appropriate masonry or timber fixings. Keep the battens set back from the front edge so the finished panel sits flush. Check every batten with a spirit level before you screw it home.
Step 4: Fit the Base and Panels
Cut a moisture-resistant MDF or plywood base and raise it on 50mm bearers so air can move underneath. Fit the side and back panels next, then the front panel with the entry opening cut out. Round the opening edges with a router or sanding block.
Step 5: Ventilate and Finish
Fit a low-level vent grille and a high-level vent grille so air can circulate. Seal exposed edges, fill screw heads, and paint or veneer the unit to match your hallway joinery. Allow the finish to cure fully before your pet uses the space.
What You’ll Need Before You Start
- Tape measure, spirit level and pencil
- Moisture-resistant MDF or plywood
- Treated timber battens for the frame
- Wood screws, filler and sealant
- Paint or veneer to match your hallway
- Two vent grilles and a small LED strip light
- A washable pet bed cut to size
Common Mistakes to Avoid
The biggest mistake is building to the doorway rather than to the tallest point. Stair undersides slope, so a design that fits at the front can foul the underside at the back.
Other traps:
- Sealing the space with no ventilation
- Skipping a moisture barrier against an external wall
- Using untreated timber where a dog may chew
- Forgetting to leave access to your electricity meter or stopcock
If your under-stair space houses a gas meter or consumer unit, you must keep it accessible and ventilated. Blocking access is a safety issue and can breach your tenancy or insurance terms.
If the geometry is tight, a bespoke joinery approach lets the frame follow the slope exactly rather than forcing a standard box into a space it does not fit.
Under-Stairs Pet Room With Storage: Combining Comfort and Function
An under-stairs pet room with storage splits the space into two zones: a sleeping area for your pet and drawers, cupboards or shelving for you. This is where a bespoke fit beats a flat-pack box, because the dividing panel can follow the slope of the stairs.
A common layout puts the pet den at the deeper end and drawers at the shallow end, where head height drops below usable levels. You get a pet nook and a place for coats, shoes and leads in one footprint.
Ask for a removable panel between the storage and the pet zone. It lets you pull the bed out for a deep clean without dismantling the whole unit.
Ventilation, Temperature, Lighting and Safety Checklist
Airflow matters more than most people expect. A sealed under-stair box traps warm, damp air, which leads to condensation and odour. Add a vent grille at low level and another at high level so air can move through.
Work through this list before you finish the build:
- Two vent grilles fitted, low and high
- No direct heat source within the enclosure
- LED strip light on a low-heat fitting
- All cables clipped and out of reach
- Rounded edges on the entry opening
- No sharp screw tips poking through
- Door or gate that latches securely
- Smoke alarm still audible from inside
Check that your dog can stand, turn around and lie flat without touching the sides. If they cannot, the space is too small.
Measuring Stair Geometry and Cleaning Under-Stair Pet Areas
Measuring stair geometry is the step that decides whether your build works. Measure the height at the front, the middle and the back of the space, plus the width at floor level and at the lowest point of the slope.
Record the deepest and shallowest figures. Your design must clear the shallowest point, not the average.
Working Out Usable Height
Stair undersides rarely run at a constant angle. A straight flight gives a steady slope; a winder or a half-landing creates a step change in height. Measure at every point where the underside changes direction, not just at the two ends.
As a rule of thumb, a dog needs enough height to stand without their ears touching the top, to turn around without scraping the sides, and to lie flat with their legs extended. If the tallest usable point is under about 600mm, the space suits a small dog or a cat rather than a medium or large breed.
Checking the Space Suits Your Pet
- Measure your dog nose to tail while lying flat, then add roughly 150mm on each side
- Keep the entry opening at least 50mm wider than your dog’s shoulder width
- Confirm they can stand, turn and lie flat without touching the sides
- For cats, allow a raised platform and a higher entry so they can perch and watch
Cleaning and Moisture Management
Under-stair spaces sit against external walls and often against cold floors, so moisture is the main long-term enemy. Choose surfaces that wipe down: painted MDF and sealed plywood both work well. Avoid open-grain timber near a water bowl, because it swells and stains.
- Use a removable, machine-washable bed cover
- Fit a raised base so air moves under the bedding
- Seal the base and lower panels against splashes
- Leave a removable panel so you can pull the bed out for a deep clean
- Check the vent grilles monthly for dust and pet hair
Keeping the Air Fresh
A sealed under-stair box traps warm, damp air, which leads to condensation and odour. A low-level vent grille and a high-level vent grille let air move through by convection. If the space backs onto a cold external wall, add a moisture barrier before you fit the panels.
Measure at three points, build to the lowest one, and leave a removable panel for cleaning. Those three habits prevent most under-stair pet house failures.
Conclusion: Turning an Awkward Space Into a Pet-Friendly Feature
The awkward space under your stairs is one of the few places in a small home that can serve two purposes at once.
That is exactly the work Finest Furniture Studio does. We design and fit custom built-in furniture for sloping ceilings and awkward corners, with a free design visit, clear upfront pricing and no hidden fees. Our team offers a 7-day fitting service and a 10-year warranty on wardrobes.
Book a Free Design Visit with Finest Furniture Studio and turn that dead corner into a space your pet actually uses.
Frequently Asked Questions
How do you turn the space under the stairs into a pet house?
Start by measuring the usable depth, height and width of the under-stair area, noting where the sloped ceiling cuts in. Decide whether the pet house will be open-concept or gated, then plan a built-in frame that follows the stair geometry. Include a raised sleeping area, a wipeable floor surface and at least one ventilation gap. If you want it to match your home, a bespoke joinery approach lets the unit blend with existing cabinetry and adds storage above or beside the pet space.
How big should an under-stair pet space be?
The space needs to be large enough for your pet to stand, turn around and lie down fully stretched out. For a small dog, that often means a floor area roughly 60cm by 90cm, while a large dog may need closer to 90cm by 120cm. Height matters too: allow at least 10cm of clearance above your pet’s head when standing. Measure your pet first, then check the under-stair dimensions before committing to a design.
How can you make an under-stair pet house comfortable and well ventilated?
Comfort comes from a raised, washable bed, a draught-free but breathable enclosure and a floor surface that does not stay damp. Ventilation is the part most people miss: add vents or a slatted panel at the back or side so air can move through, and avoid sealing the space completely. Choose moisture-resistant materials such as sealed MDF or hardwood ply, and keep the area away from radiators and direct heat sources.
Can you add storage to an integrated pet house?
Yes, and it is one of the main reasons people choose a built-in design. Common options include drawers below the sleeping platform for leads, toys and grooming tools, open shelving above the pet opening for household items, and a cupboard section beside the nook for coats or shoes. The key is to keep the pet’s entry opening clear and to use materials that resist moisture and scratching.

