
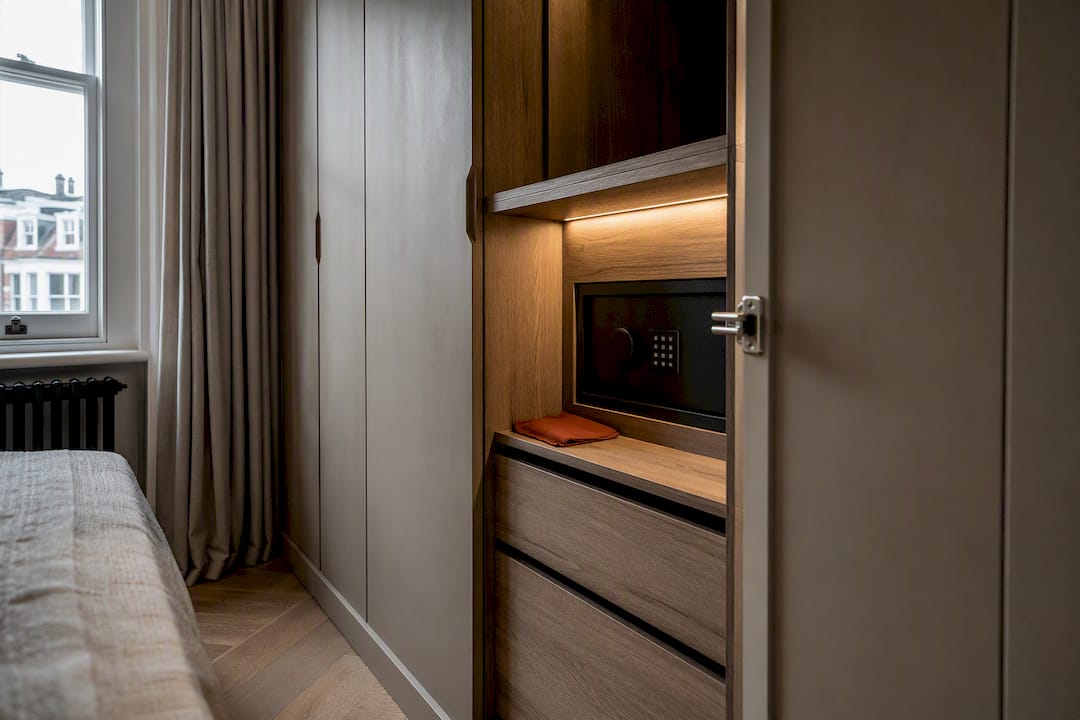
Yes, a wardrobe can house a genuine, insurance-acceptable safe when the cabinet is designed around it from the start. Most integrated safes fit standard 600mm cabinet bays, so a bespoke wardrobe from a fitter like Finest Furniture Studio can absorb one without looking bolted on. The trade-off is real, though: the more concealed the safe, the harder it can be to anchor properly, and insurers care far more about anchoring than about how well it’s hidden.
TL;DR:
- A wardrobe safe must be properly anchored into solid walls or floors to meet insurance requirements, especially in concrete or load-bearing structures.
- Integrated safes are best built into bespoke wardrobes with early planning for power, anchoring, and finish, avoiding costly retrofits and ensuring proper documentation.
- Drawer-front safes fit standard 600mm cabinet bays and are suitable for retrofit installation, while wall-cavity and underfloor safes require structural work during design.
- Placement should prioritize structural stability and insurer specifications, avoiding suspended timber floors or obvious locations like master bedroom wardrobes.
- Choosing a safe with interior features tailored to valuables, and working with experienced trades, ensures both security compliance and practical daily access.
Table of Contents
- Types of wardrobe-integrated safes and common sizes
- Where to place the safe: concealment, access and insurance
- Designing the wardrobe and safe bay to fit seamlessly
- Choosing the right safe for insurance and daily use
- Working with a bespoke fitter and a safe specialist
- Why we build the safe into the joinery, not around it
- Book a free design visit for your integrated safe wardrobe
- Sources
- FAQ
Types of wardrobe-integrated safes and common sizes
Not every safe belongs in a wardrobe, and the format you choose shapes how the cabinetry gets built around it. Drawer-front safes are the most popular option for bespoke joinery because they’re designed to fit standard cabinet widths such as 600mm and slot into a false-drawer front, keeping the exterior looking like ordinary storage. Some models install into the cabinet cavity in a short time frame, which matters if your fitter is working to a tight installation window.
Beyond drawer-fronts, several other formats suit wardrobe integration:
- Low-profile horizontal safes sit beneath a raised floor panel or shelf, ideal where headroom is limited but floor depth is generous.
- Wall-cavity safes recess into a stud or masonry wall behind the wardrobe carcass, useful where the party wall is solid brick or block.
- Underfloor safes work only where a concrete slab sits beneath the wardrobe, since timber joists rarely give sufficient support.
- Quick-access biometric or keypad boxes favour speed of use over maximum resistance. Full-body steel safes trade convenience for far greater resistance to forced or manipulated entry.
For retrofit projects into an existing wardrobe, drawer-front and low-profile units are usually the only realistic choice, since wall-cavity and underfloor installations need structural work best planned at the bespoke design stage.
Where to place the safe: concealment, access and insurance

Placement decides whether the safe is convenient, well hidden, or acceptable to your insurer, and rarely all three at once. Master bedroom wardrobes are the most common hosting location because they use otherwise dead space, but that popularity makes them predictable. Security guidance consistently flags that a determined intruder checks the main bedroom wardrobe first, which is worth weighing against pure convenience.
Three placement principles matter more than the room itself:
- Prioritise structural anchoring over novelty. A safe in a less obvious spot, such as a guest room wardrobe or a false-backed utility cupboard, still needs a solid floor or load-bearing wall behind it.
- Avoid suspended timber floorboards unless they’re reinforced, since thin timber offers poor anchor resistance compared with concrete.
- Check how placement affects your policy before committing to a design, since some insurers assess location as carefully as the safe’s rating.
Pro Tip: Ask your structural surveyor to check floor composition before your wardrobe design is finalised. Discovering a suspended timber floor after installation usually means an expensive retrofit.
Designing the wardrobe and safe bay to fit seamlessly
A safe that looks bolted into an afterthought space is a safe that was never planned properly; for more details on finishes that help integration, see interior closet doors. Getting a clean, secure result means treating the safe bay as a design decision from day one, not a modification after the wardrobe carcass is built. Experts recommend deciding on the safe bay early, because retrofitting power routing, clearance and anchoring into finished cabinetry is far harder than building them in from the outset.
Good practice in bespoke joinery includes:
- Building a plywood or MDF sleeve that cradles the safe and ties into the cabinet carcass, so the load shares between the furniture and the building structure behind it.
- Using architectural flanges or steel backing plates where cabinet-optimised safes supply them, since manufacturers design these fittings for a flush, furniture-like finish.
- Routing power discreetly for electronic locks or interior lighting before the cabinet back panel goes on.
- Avoiding thin cabinet backs, light-duty drawer runners, or freestanding units with no fixing points, all of which undermine an otherwise good safe.
Ask your installer to photograph the anchoring stage and provide an installation certificate. Many insurers request exactly this kind of documentation before they’ll cover higher-value contents, and having it on file saves arguments later. For more on how this kind of integration changes a wardrobe’s finish and function, see why integrated wardrobes are the smart choice.
Choosing the right safe for insurance and daily use
The safe you choose matters less than whether it satisfies the people who’ll actually assess it: your insurer and your installer. Confirm your policy’s requirements before you buy anything, since insurers often specify a minimum cash or valuables rating and sometimes require professional installation as a condition of cover.
Beyond the rating itself, match the safe’s internal layout to what you’ll actually store:
- Documents and jewellery need shelving or a felt-lined drawer rather than a bare steel box.
- Firearms require dedicated cabinet-rated storage under separate legal rules, not a general-purpose safe.
- Electronics and hard drives benefit from a fire-rated interior if backups aren’t kept elsewhere.
- Mechanical locks are simple and reliable with no battery to fail; electronic keypads and biometric locks offer faster daily access but need maintenance.
A heavy safe left unanchored is still a target. Concealment inside good cabinetry is a visual cover, not a substitute for the safe itself and proper fixings, so weight alone should never be your only security measure.
Working with a bespoke fitter and a safe specialist
Getting the right result usually means coordinating two trades rather than picking one. Before you commit to either, ask them:
- Can you provide an installation certificate and reference from an insurer-approved job? Documentation matters more than a verbal assurance.
- Have you fitted an integrated safe into bespoke cabinetry before, or only freestanding units? The skills don’t fully overlap.
- How do you coordinate the site survey, structural reinforcement and power routing between the joinery fitter and the safe installer?
- What drives the total cost on this job: the safe’s grade, the anchoring complexity, or the cabinetry modification?
Costs vary with all three factors, and grade, anchoring difficulty and joinery changes usually matter more than the safe’s list price. DIY anchoring is tempting but risky: insurers frequently reject claims tied to unprofessional installation, particularly where documentation is missing entirely.
Why we build the safe into the joinery, not around it

A safe fitted after the wardrobe is finished nearly always looks like exactly that: an addition. We plan the safe bay at the design stage, alongside hanging space, drawers and lighting, so the anchoring, power routing and finish come together as one piece of furniture rather than a compromise bolted onto an existing carcass.
That approach pays off most clearly when insurance is involved. A safe installed with proper documentation, correct anchoring into a suitable wall or floor, and a finish that matches the rest of the wardrobe gives homeowners a stronger footing with insurers than a hastily retrofitted unit ever will. Bespoke fitting costs more than a freestanding box from a hardware shop, but for anyone storing documents, jewellery or valuables they’d genuinely miss, that’s usually the point where the investment earns its keep.
— Aureliu
Book a free design visit for your integrated safe wardrobe
If you’re weighing up a wardrobe with a built-in safe against separate freestanding options, the deciding factor is usually who plans the anchoring and finish together. A bespoke joinery fitter designs the safe bay as part of the wardrobe carcass from the outset, with structural anchoring, power routing and a flush finish handled in one visit rather than two separate trades working around each other.

Our typical installation runs 7 to 12 days from confirmed design to finished fit, backed by a 10-year guarantee on the joinery itself, and we take away and dispose of your old wardrobe as part of the job. Before your free design visit, have your safe’s intended size and contents roughly worked out, and check your insurer’s requirements so we can plan anchoring to match. Explore our custom made wardrobes for West London homes, or call 07468 150807 or WhatsApp us to arrange a site survey. We’re based at 124 City Road, Kemp House, London, EC1V 2NX, serving Richmond, Wimbledon, Putney, Kingston, Chiswick, Fulham, Chelsea, Ealing, Twickenham, Barnes and Hammersmith.
Sources
- SafeOptions: install home safe guide
- SafeSecureHomes: where to install a home security safe
- Steelage: setting up a safe at home
- BlumSafe: cabinet installation guide
FAQ
What kind of cupboard has a built-in safe?
A bespoke fitted wardrobe or cabinet with a reinforced bay, typically built around a drawer-front or low-profile safe sized for a standard 600mm cabinet width, is the most common format.
What are the downsides of having built-in wardrobes?
Built-in wardrobes cost more upfront than freestanding units and can’t move with you, but for safe integration specifically, they offer far better anchoring options into walls or floors than freestanding furniture typically allows.
Where is the safest place to put a safe in a house?
Anywhere with a solid concrete floor or load-bearing wall behind it, ideally somewhere less obvious than the master bedroom wardrobe, since that remains the first place most intruders check.
Is it cheaper to build a wardrobe or buy one?
An off-the-shelf wardrobe is usually cheaper initially, but adding a safe afterwards often means costly retrofitting; planning the safe bay into a bespoke design from the start can avoid that extra expense.
Does adding a safe to my wardrobe affect my home insurance?
It can, since many insurers require professional installation and documented anchoring for higher-value contents, so check your policy’s requirements before finalising the design.

