
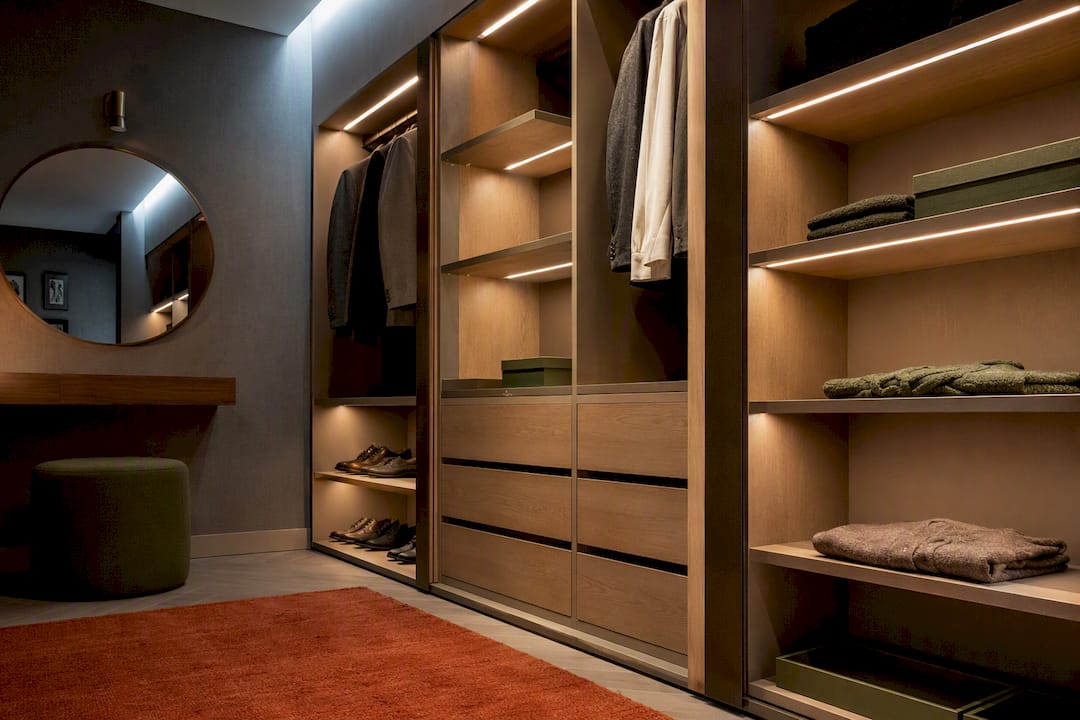
The best all-round solution is motion-activated LED strips with a neutral colour temperature, fitted along the front edge of shelves and inside hanging rails. This combination solves the two problems that matter most: seeing clothes clearly and never fumbling for a switch. For a fast retrofit, battery motion strips do the job with no wiring at all; for a permanent, higher-end result, hardwired recessed downlights integrated into bespoke joinery deliver the cleanest finish and the most reliable colour accuracy.
TL;DR:
- Recessed or strip LED lighting positioned at shelf fronts and hanging rails enhances visibility and colour accuracy in wardrobes.
- Using CRI 90+ and a CCT of 3500-4000K ensures true colour rendering suitable for dressing and fabric matching.
- Battery motion strips are quick to install but require frequent battery replacements, whereas hardwired systems last longer and are more discreet.
- Proper planning during wardrobe design allows drivers to be concealed, leads to better finishes, and facilitates easier future maintenance.
- Smart home integration provides remote control and automation, but reliable sensor placement and positioning generally outperform overly complex setups.
Table of Contents
- Eight wardrobe lighting ideas worth fitting
- How do you choose CRI, CCT and lux for a wardrobe?
- How do you power and install wardrobe lights safely?
- Retrofit checklist: adding lights to an existing wardrobe
- Why plan lighting with bespoke joinery from the start?
- How long do wardrobe lights last, and what maintenance do they need?
- Which wardrobe lighting is cheapest to run?
- How does lighting change the look of a wardrobe?
- Can wardrobe lighting connect to a smart home system?
- Get bespoke wardrobe lighting fitted properly, without the retrofit compromises
- Retrofits solve the immediate problem, integrated lighting solves the actual one
- Sources
- FAQ
Eight wardrobe lighting ideas worth fitting
Most wardrobes fail on lighting for one of two reasons: the light is in the wrong place, or it’s the wrong quality. Fix the position first, then the specification. Here are eight approaches we see work consistently across the wardrobes and walk-in dressing spaces we design, from a compact fitted unit in a Wimbledon bedroom to a full walk-in in Richmond.
- LED strip lighting along shelf fronts. Mounted at the leading edge of each shelf, this washes light down onto the shelf below, making folded jumpers and shoe boxes visible without a single dark corner.
- Integrated hanging-rail LED. A slim profile fixed above the rail throws light forward onto garments rather than down onto your head, which is the difference between actually seeing colour and guessing at it.
- Recessed downlights for walk-in aisles. These give broad, even ambient light through a walk-in wardrobe and work well as the base layer before you add task lighting elsewhere.
- Puck spotlights on display shelves and drawers. Small, round fittings that pick out folded knitwear, handbags or trainers kept as display pieces, similar to how a boutique lights its shelving.
- Battery motion-activated strips for fast retrofits. No wiring, no electrician, fitted with adhesive pads in minutes. The obvious trade-off is battery changes every few months.
- Door-contact switches for hinged doors. A magnetic reed switch triggers the light the instant the door opens, which is more dependable in a hinged wardrobe than a motion sensor that can miss slow, quiet movement.
- Vertical mirror lights or sconces for dressing accuracy. Fitted either side of a mirror rather than above it, these avoid the harsh shadows a single overhead spot creates on your face.
- Accent backlighting for glass-front or display cabinetry. A thin LED strip behind a glass panel turns a storage unit into something closer to a feature, particularly effective in a dressing room built around a single striking display run.
Retail kits such as IKEA’s wardrobe lighting range cover several of these with off-the-shelf LED strip and sensor units, which makes them a sensible low-cost entry point if you’re testing an idea before committing to something built in.
Pro Tip: Fit shelf-front strips slightly recessed rather than flush. A few millimetres of set-back stops the LED line being visible as a glare source when you look into the wardrobe at eye level.
How do you choose CRI, CCT and lux for a wardrobe?
Colour rendering index (CRI) measures how accurately a light source reveals true colour compared with natural daylight, scored out of 100. For a wardrobe, specialist dressing-room lighting guidance recommends CRI 90 or above, rising to 95+ where you’re matching fabrics or checking make-up before you leave the house. Below that, navy and black can blur together and reds shift noticeably.
Colour temperature (CCT), measured in kelvin, decides how warm or cool the light looks:
- 3500 to 4000K (neutral white) is the best default for most wardrobes: warm enough to feel comfortable, cool enough to render colour honestly.
- 2700 to 3000K (warm white) suits a wardrobe you want to feel cosy and hotel-like, though it can make blacks look slightly brown.
- 5000K or above (cool white) suits a walk-in used purely as a dressing and grooming space, but it can feel clinical in a bedroom setting.
As a rough guide, hanging bays work well around around several hundred lux, while mirror and dressing zones benefit from higher lux levels. Treat those figures as a starting point rather than a fixed rule; a small, all-white wardrobe reflects more light than a deep, dark-timber one, so the same fitting can feel brighter or dimmer depending on the finish around it.
Diffusers and aluminium channel profiles matter more than most people expect. A bare LED strip creates visible “dotting”, little bright points along the run, whereas a frosted diffuser inside an aluminium profile spreads that into a smooth, even line and helps manage heat at the same time, a point echoed in technical LED installation guidance. Never mix CCTs within a single wardrobe; two subtly different whites side by side will look like a fault, not a design choice. Test any strip against a white t-shirt and a black jumper before fitting it permanently, since that’s the fastest way to spot poor colour rendering.

How do you power and install wardrobe lights safely?
Three power routes cover almost every wardrobe: battery packs for tool-free retrofits, plug-in transformers for a semi-permanent setup near a socket, and hardwired transformers for a built-in finish with no visible cabling. Battery is cheapest and fastest but needs recharging or replacing; hardwired costs more upfront but disappears completely once fitted.
- Size the driver with a 15 to 25% safety margin above your total LED wattage, so it isn’t running flat out and shortening its own life.
- Choose 24V systems over 12V for longer strip runs; the higher voltage reduces voltage drop along the cable, which otherwise shows up as dimming towards the far end of a long shelf.
- For sensors, PIR motion detectors suit open or walk-in wardrobes where movement is broad; door-contact reed switches suit hinged doors where a quick, precise trigger matters more; infrared sensors sit between the two and work well on sliding doors.
- Route cable inside the joinery void where possible, away from heat sources, and keep drivers accessible for future servicing rather than sealed behind a fixed panel.
Pro Tip: If your installation involves any new fixed wiring back to the consumer unit rather than a simple plug-in transformer, that work falls under Part P of the Building Regulations and needs a registered electrician, even inside a wardrobe.
Retrofit checklist: adding lights to an existing wardrobe
You can add lighting to most existing wardrobes without touching the carcass. Measure shelf depth and door type first: hinged doors suit contact switches, sliding doors suit infrared or timed sensors, and shallow shelves rule out bulky puck fittings. Check for a nearby socket if you’re avoiding battery power, since that decides whether plug-in is realistic without extending cable runs across the room.
Surface-mounted aluminium profiles give the neatest retrofit finish; adhesive strips alone tend to sag or peel within a year in a warm wardrobe. Hide transformers behind a shelf lip or inside a drawer void rather than leaving them dangling, and route cable along the back edge of shelves, not across the middle where clothes will catch it.
- Measure shelf depth, door type and nearest power source.
- Choose battery, plug-in or hardwired based on that survey.
- Pick strip length and profile to match shelf and rail dimensions.
- Test colour and brightness against real clothing before final fixing.
- Mount, route cable neatly, then fit the sensor last.
The most common mistake is buying strip length by guesswork rather than measuring the actual run, which leaves an awkward gap or a strip that has to be doubled back on itself.
Why plan lighting with bespoke joinery from the start?
Retrofitting is fine for a quick fix, but planning lighting alongside the wardrobe itself, rather than after, solves problems retrofits can’t, as explained in custom closets designed for real life. Drivers get concealed within the carcass, finishes are matched to the joinery rather than left as a visible white strip, and there’s built-in access for future servicing. Specialist bespoke lighting guidance points to mock-ups and integrated planning as the way to avoid heat and access problems in enclosed cabinetry, which is exactly the approach we take on every project.

Finest Furniture Studio fits most bespoke wardrobes within seven to twelve days and backs every installation with a 10-year guarantee, covering areas including Richmond, Wimbledon, Kingston, Chiswick and Twickenham. Our guide to concealed wardrobe lighting covers the full integrated approach in more depth.
How long do wardrobe lights last, and what maintenance do they need?
Quality LED strips typically run for 25,000 to 50,000 hours before noticeable dimming, which at a few hours of use daily can mean a decade or more before replacement. The components most likely to fail first aren’t the LEDs themselves but the driver and the sensor, both of which see more electrical cycling than the light source.
Dust is the main maintenance issue inside a wardrobe. A build-up on the diffuser or lens dulls output gradually, so a light wipe with a dry cloth every few months keeps brightness consistent. PIR sensors can become less responsive if dust settles over the lens, which shows up as delayed triggering rather than total failure.
Battery-powered strips need the batteries checked every few months, and rechargeable packs degrade faster in warmer wardrobes near hot-water pipes or airing cupboards. Hardwired systems avoid that entirely, which is one reason integrated installations tend to outlast bolt-on battery kits in practice. If a strip does fail, buying from a range with published EPREL registration data makes it easier to source an exact replacement with matching CCT and CRI, rather than guessing at a close match.
Which wardrobe lighting is cheapest to run?
LED is the only sensible choice on running cost now; a typical wardrobe strip draws somewhere between 5 and 15 watts for a full run, against the far higher draw of the halogen puck lights still found in older built-in units. Left on an occasional motion trigger rather than a permanent circuit, the electricity cost over a year is negligible compared with almost any other lighting in the home.
The real cost differences come from upfront choices, not electricity bills. Battery strips avoid installation labour entirely but carry an ongoing cost in replacement batteries. Plug-in transformer kits sit in the middle: no electrician needed, but you’re paying for a driver and a socket run. Hardwired, integrated lighting costs the most to fit because it involves proper wiring and often an electrician, but it needs no consumable batteries and, fitted well, should outlast several redecorations of the room around it.
Dimmable drivers add a small premium but let you run strips below full output, which both saves a little power and extends component life, since LEDs run cooler when dimmed. If you’re deciding between a cheap battery kit and a hardwired system, the honest comparison isn’t which is more efficient (both are efficient) but how long you plan to keep the wardrobe as it is. A quick rental fix favours battery; a permanent bedroom refit favours hardwired.
How does lighting change the look of a wardrobe?
Lighting style should follow the wardrobe’s own design language, not sit apart from it. A Shaker-style fitted wardrobe with painted panel doors suits warm, concealed strip lighting that stays hidden behind a frame, keeping the traditional look intact when the doors are closed. A handleless, modern fitted wardrobe with flat lacquered doors suits the opposite: exposed, precise linear LED that becomes part of the visual design rather than something tucked away.

Walk-in wardrobes and dressing rooms give more scope for layering. Design guidance for luxury dressing spaces recommends combining ambient, task and accent lighting rather than relying on one source, which is why a well-lit walk-in usually has ceiling downlights, shelf-front strips and a dedicated mirror light working together rather than a single central fitting doing everything. Glass-front cabinetry and open display shelving change the brief again: here, lighting becomes decorative as much as functional, turning folded shirts or a shoe collection into something closer to a retail display than storage.
Wood-effect wardrobe finishes generally read best under a neutral to warm CCT, since cooler light can make timber tones look artificial or slightly green. Gloss and lacquered finishes handle cooler, brighter light more comfortably because the reflective surface itself adds warmth back into the room. If you’re planning a full fitted wardrobe scheme, our guide to luxury walk-in wardrobe lighting layouts covers layered lighting design in more detail.
Can wardrobe lighting connect to a smart home system?
Yes, and it’s increasingly the default rather than the exception on new installations. Smart bulbs and strips built around standard hub protocols let you control wardrobe lighting from the same app running the rest of the house, group it into scenes (“getting ready” or “night”), and set schedules so lights never stay on if a sensor happens to misfire.
The practical benefit inside a wardrobe is less about novelty and more about avoiding the two classic sensor complaints: lights that time out too soon while you’re still choosing an outfit, and lights left running because a door was left ajar. App-based control lets you adjust timeout duration and sensitivity remotely rather than opening up the fitting to change a physical dial. Voice control adds a genuinely useful option for anyone standing in a walk-in with their hands full of hangers.
The trade-off is complexity. A basic motion strip needs no setup at all; a smart system needs a hub, an app, and occasionally a firmware update. For most wardrobes, we’d suggest starting simple and only automating the parts that cause real friction, typically the walk-in aisle and mirror zone, rather than converting every single fitting to a connected one on day one. Simple, reliable sensors still beat a smart system that’s fiddly to configure and easy to leave misconfigured.
Get bespoke wardrobe lighting fitted properly, without the retrofit compromises
A retrofit LED strip solves an immediate problem, but it rarely matches what’s possible when lighting is planned alongside the wardrobe itself, with drivers hidden, finishes matched and sensors positioned exactly where they’re needed. Finest Furniture Studio designs and fits bespoke wardrobes, walk-in closets and awkward-space storage across Richmond, Wimbledon, Putney, Kingston, Chiswick, Fulham, Chelsea, Ealing, Twickenham, Barnes and Hammersmith, along with Central London, New Malden, Maidenhead, Brixton, Walton-on-Thames, Woking, Bracknell, Reading and Guildford.
Every project comes with a 10-year guarantee, typical installation within seven to twelve days, and we’ll take away and dispose of your old wardrobe as part of the job, so there’s no separate removal to arrange. If you’re planning a full fitted or walk-in wardrobe with integrated lighting, our complete guide to bespoke wardrobes in West London covers design options, pricing considerations and what a design visit involves.
Contact us for a free design visit; message or call us for more information on 📞07468 150807 or WhatsApp. You can also find us at 124 City Road, Kemp House, London, EC1V 2NX.
Retrofits solve the immediate problem, integrated lighting solves the actual one
Most advice on this topic treats wardrobe lighting as a bolt-on decision made after the wardrobe is finished, which is exactly backwards. The wardrobes that end up looking professionally lit, rather than lit as an afterthought, are the ones where the shelf depths, driver locations and sensor positions were decided at the design stage, not squeezed in around finished joinery.
The conventional advice fixates on which product to buy, strip versus spotlight, battery versus hardwired, without asking the more useful question: what will this wardrobe actually be used for, and by whom? A dressing area used daily for outfit decisions justifies the CRI 90+ neutral white and mirror-side sconces; a spare-room wardrobe used mainly for storage doesn’t need that level of colour accuracy at all.
If you take one thing from this, prioritise position and colour quality over gadgetry. A well-placed, well-specified basic strip beats a smart, app-controlled fitting mounted in the wrong place every time.
— Aureliu
Sources
- Walk-in closet lighting: stylist tips — MioLook
- The Crosby Store — The dream dressing room: six design principles
- IKEA — Wardrobe lighting
FAQ
What is the best way to light a wardrobe?
Fit LED strips along shelf fronts and hanging rails with a neutral CCT around 3500 to 4000K and CRI of 90 or higher, triggered by a motion or door-contact sensor rather than a manual switch.
What is the best type of lighting for a wardrobe?
LED is the practical standard for wardrobes because it runs cool, uses very little power, and comes in slim strip and puck formats that fit shallow shelves and rails where other bulb types can’t.
What are some good options for wardrobe lights?
LED strip lighting, puck spotlights, battery motion-activated strips, door-contact switches and recessed downlights all work well, with retail kits such as IKEA’s wardrobe lighting range offering an accessible starting point.
Can I add lights to an existing wardrobe?
Yes. Battery motion-activated LED strips fit with adhesive pads and need no wiring at all, while plug-in transformer kits and hardwired options offer more permanent results if you’re happy to route a cable or bring in an electrician.

