

Table of Contents
- Planning Your Under Stairs Media Unit
- How to Measure Under Stairs for a Fitted Unit
- Under Stairs TV Unit Ideas: Design and Layout
- Under Stairs TV Unit with Storage Solutions
- Materials, Finishes and Construction Details
- Under Stairs Media Unit Cable Management
- Installation and Next Steps
- Frequently Asked Questions
Last Updated: October 10, 2026
Planning Your Under Stairs Media Unit
An under stairs media unit transforms wasted space into functional storage and entertainment. Whether you’re working with a tight alcove or an awkward angled ceiling, a custom build lets you maximise every inch while creating a feature that complements your home’s style.
The key is understanding your space first, then designing around it.
Assessing your space and staircase shape
Staircase geometry varies dramatically: straight runs, curves, spirals, or odd angles. A sloping ceiling creates height constraints that change as you move deeper into the alcove.
Photograph from multiple angles. Note staircase structure and clearance beneath each step. Check for electrical outlets, water pipes, or heating ducts that may run through the space.
Understanding viewing angles and TV placement
Television placement defines the entire layout. The ideal viewing distance is roughly 1.5 to 2.5 times the screen diagonal.
Position the centre of the screen at eye level when seated (typically 1.0-1.2 metres from the floor). With a sloping ceiling, the TV may sit lower at the back or angle slightly downward.
Position the TV away from direct sunlight to reduce glare and eye strain.
How to Measure Under Stairs for a Fitted Unit
Accurate measurements are the foundation of a successful custom build. Small errors compound when you’re working with angled spaces and tight tolerances.
Taking accurate height, depth and width measurements
Measure width at three points (top, middle, bottom) and record the smallest, as this is your limiting constraint.
For depth, measure from the front edge to the back wall at three points and record the shallowest depth.
Measure height from floor to ceiling at 30cm intervals back into the alcove. Plot on paper to visualise the slope and identify where tall and short compartments fit.
Check if the floor is level; uneven floors may require shimming during installation.
Accounting for sloping ceilings and awkward angles
Measure the slope rate: the difference in ceiling height between the front edge and 30cm back. A 5cm drop per 30cm is steep; 2cm is gradual.
Shelves must be stepped or angled to avoid the ceiling. Stepped shelves suit display; angled shelves suit flat media storage.
For half-landings or curves, measure angles at the turn; curved spaces need modular units that follow the contour.
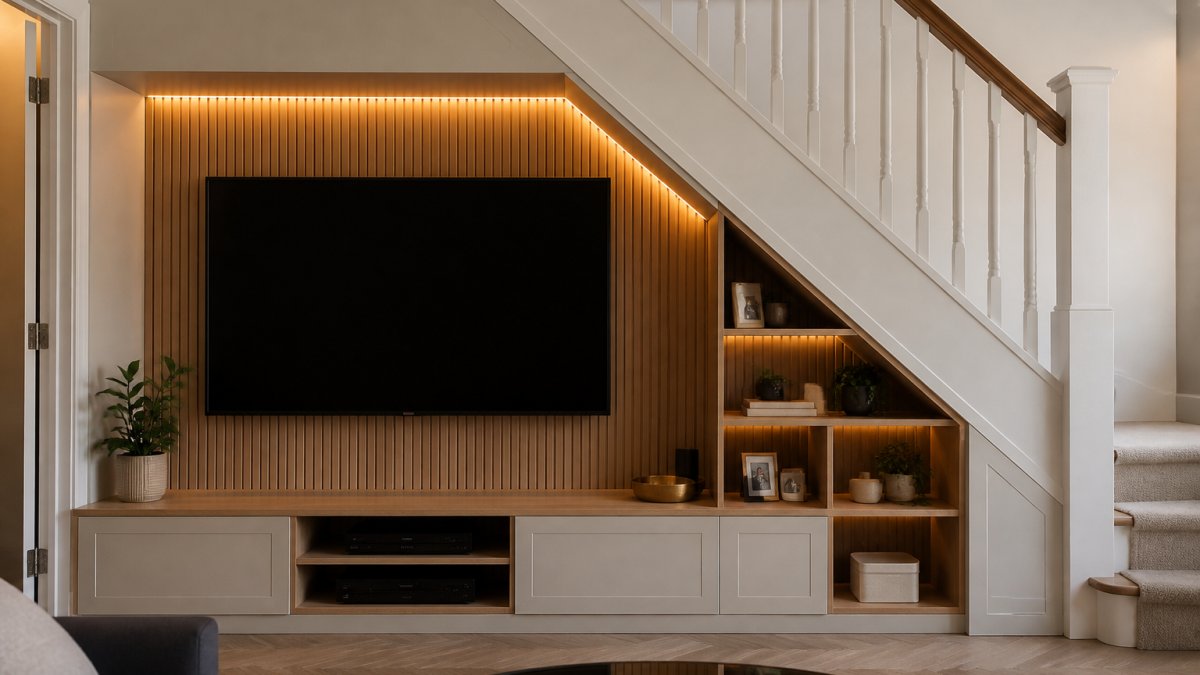
Under Stairs TV Unit Ideas: Design and Layout
Design choices shape both function and aesthetics. Two broad approaches dominate: open shelving and closed storage.
Open shelving versus closed cupboard designs
Open shelving creates visual lightness and displays items well but accumulates dust and shows clutter.
Closed cupboards hide clutter and reduce dust. A mix of open shelves and closed cupboards balances aesthetics with practicality.
Creating a feature wall with wood panelling and finishes
Wood panelling elevates the unit from functional storage to a design statement, framing the TV and creating visual depth.
Horizontal panelling widens narrow spaces; vertical panelling draws the eye upward in low-ceiling alcoves. Shiplap or board-and-batten suit modern and traditional homes.
Light finishes brighten dark alcoves; dark finishes create drama. Warm wood tones suit traditional homes; cool greys suit contemporary spaces.
Recessed downlights reduce glare; LED strip lighting adds ambience and highlights items.
Under Stairs TV Unit with Storage Solutions
Storage capacity determines whether your unit solves real clutter problems or simply looks attractive.
Drawer units and cupboards for media equipment
Drawers suit small items (remotes, cables, batteries). Soft-close mechanisms prevent slamming and extend lifespan.
Cupboards suit larger equipment (gaming consoles, soundbars, hard drives). Internal shelving or pull-out baskets keep contents organised.
Alcove depth determines sizing: shallow spaces (under 40cm) suit narrow drawers; deeper alcoves allow full-depth storage.
Maximising every inch of unused space
Triangular spaces house angled shelves or narrow cupboards. Space under the lowest step fits shallow drawers. Corners suit L-shaped shelving or carousel units.
A fitted unit designed to exact measurements uses 15-25% more space than off-the-shelf alternatives.
| Storage Type | Best For | Depth Needed | Access |
|---|---|---|---|
| Open shelves | Display, books, media | 25-35cm | Easy |
| Closed cupboards | Equipment, cables | 40-50cm | Good |
| Drawers | Small items, remotes | 30-40cm | Excellent |
| Angled shelves | Sloping ceilings | 20-40cm | Moderate |
Materials, Finishes and Construction Details
Choosing MDF, timber and underlayment
MDF is cost-effective, stable, and accepts paint and veneer finishes well. It’s heavier than timber, which simplifies wall installation.
Solid timber offers natural beauty and longevity but requires sealing to resist moisture and dust.
Plywood combines strength with lighter weight and offers timber aesthetics at lower cost.
Underlayment strengthens the structure and prevents sagging, especially important for shelves supporting TVs or speakers.
Durability and long-term maintenance
Painted finishes hide dust; stained wood needs periodic resealing in humid areas. Veneer finishes offer durability and easy cleaning.
Avoid moisture-absorbing materials in damp alcoves. Ensure ventilation around electronics. Check shelf supports annually.
Under Stairs Media Unit Cable Management
Poor cable management looks messy, makes equipment difficult to service, and creates safety risks in enclosed alcove spaces.
Planning electrical access and safety
Locate existing outlets before designing. If none exist within reach, hire a qualified electrician to install one. Never run cables across walkways or under carpets.
Any new socket outlet or circuit modification must comply with Building Regulations Approved Document P, or be installed by a Part P certified electrician. Poor termination in an enclosed space risks fire.
Plan cable routes during design. Use vertical cable trays or channels to hide wires and allow heat escape. Use cable grommets in all drilled holes to protect insulation.
Use a dedicated power strip with surge protection and RCD inside a cupboard or behind the unit. Label each cable at both ends for easy identification during maintenance.
Never coil excess cable tightly. Use cable clips spaced 30-50cm apart to support runs and prevent sagging.
Ventilation and heat management for equipment
Poor ventilation shortens equipment lifespan and increases failure risk. This is critical in under stairs alcoves where air circulation is naturally poor.
Allow at least 5cm clearance behind equipment for air circulation. Use spacers or brackets if alcove depth is tight.
Drill 50mm louvered vents in cupboard doors or use perforated panels. Position vents low on the cupboard face. If you cannot hold your hand in front of a vent for 10 seconds, airflow is inadequate.
For high-heat equipment, consider passive ventilation channels (vertical ducts from low to high vent) that allow warm air to rise naturally.
Monitor temperature during use. If a cupboard feels warm to the touch after 2-3 hours, improve ventilation immediately.
Streaming devices, gaming consoles, and routers that run continuously must sit on open shelves or well-ventilated compartments. Never stack equipment without spacing.
Cable routing and fire safety
Route cables around the perimeter or through the backing board, never through the void space between treads.
Use fire-resistant cable trunking if cables run near timber or MDF. Standard PVC can soften if exposed to heat; fire-rated alternatives (LSHF) are safer in enclosed spaces.
Keep power cables separate from signal cables by at least 5cm to reduce electromagnetic interference.
Label the circuit breaker clearly so anyone can isolate power to the media unit in an emergency.
Installation and Next Steps
Installation transforms design into reality. The difference between a unit that lasts 20 years and one that sags or fails within five comes down to structural assessment, precise measurement-to-build workflow, and correct fixing methods.
Understanding the measurement-to-build workflow
Step 1: Site survey and structural assessment. Measure alcove width, depth, and height at multiple points. Photograph from multiple angles.
Step 2: Design and approval. Sketch your design to scale.
Step 3: Material procurement. Order materials cut to size where possible. Specify exact dimensions for backing boards, shelves, and frame components.
Step 4: Frame assembly and wall fixing. Build the main frame off-site if possible. Check squareness and strength before installation.
For solid walls, use heavy-duty cavity anchors or expanding bolts rated for at least double the expected load.
For hollow walls, locate studs and screw directly into them using 75mm wood screws.
Step 5: Shelf and component installation. Install shelves, backing boards, and cupboards. Check each shelf with a spirit level.
Step 6: Finishing and testing. Paint, stain, or veneer surfaces. Install lighting, power strips, and equipment. Test all shelves under load.
Structural assessment and fixing methods
Solid walls (brick or block): Use heavy-duty cavity anchors rated for at least 20 kg per fixing. Drill a pilot hole, insert the anchor, and tighten the bolt. For a large TV and shelving, use at least four fixings spaced evenly across the width.
Hollow walls (plasterboard over timber studs): Locate studs using a stud finder and mark them on the wall. Screw directly into studs using 75-millimetre wood screws (minimum 8-gauge). If your design doesn’t align with stud positions, use heavy-duty toggle bolts. Spring toggles (also called butterfly anchors) have wings that open behind the plasterboard, anchoring securely.
Uneven walls and floors: Most alcoves have slightly uneven walls or sloping floors. Use shims (thin wedges of timber or plastic) under the base frame to level it. Check with a spirit level in both directions before securing fixings. Shims prevent shelves from tilting and reduce stress on fixings.
DIY assembly versus professional fitting
Pre-fabricated components can be assembled by a confident DIYer with basic carpentry skills and the right tools (drill, level, tape measure, screwdriver, saw). Assembly of shelves, backing boards, and cupboards is straightforward if components are cut accurately.
Wall mounting and final fitting are best left to professionals. Locating studs, choosing correct fixings, and ensuring everything is level and plumb requires experience. A professional installer will complete the job in 1-2 days; a DIY approach often takes longer and risks structural failure.
If you choose DIY fitting, hire a professional to assess the wall structure and recommend fixings. This ensures you use the right anchors and spacing for your wall type.
Getting a free design consultation
A design consultation clarifies your vision and catches problems before construction starts. A designer measures your space, discusses your needs, and sketches options. They’ll identify structural challenges, recommend materials, and explain what’s achievable within your budget and timeline.
Finest Furniture Studio offers a complimentary design visit where we assess your under stairs space, discuss layout ideas, and provide transparent guidance on what’s possible. We’ll explain material choices, discuss cable management and ventilation, answer questions about durability and maintenance, and outline the full installation workflow.
A consultation also reveals hidden challenges: unusual angles, existing fixtures, structural issues, or utilities that affect design. Addressing these early prevents costly changes later and ensures your finished unit is safe, functional, and built to last.
Frequently Asked Questions
How much does a custom under stairs media unit cost?
Pricing depends on the size of your space, materials chosen, complexity of the design, and whether you include storage cupboards, drawers, or shelving. A simple open-shelving unit costs less than a fully custom fitted solution with integrated storage and cable management. Contact Finest Furniture Studio for a free design visit and transparent quote with no hidden fees.
Can you fit a TV under the stairs if you have a sloping ceiling?
Yes. Sloping ceilings are common in under-stairs spaces and can be accommodated with careful design. The TV placement depends on the height at the viewing point, not the highest point of the slope. A professional design visit ensures your TV sits at a comfortable viewing angle and the entire unit is built to fit the exact dimensions of your staircase, maximising the usable space.
How long does it take from design to installation?
The timeline varies depending on the complexity of your custom build. Finest Furniture Studio offers a 7-day fitting service once your bespoke unit is ready, meaning installation is quick and minimally disruptive to your home. The total project time includes the initial design consultation, custom fabrication, and final fitting.
What’s the best way to manage cables and ventilation in a built-in media unit?
Plan cable routes during the design phase by identifying where power sockets and TV connections will sit. Built-in units need ventilation holes or gaps to allow air circulation around equipment like amplifiers and set-top boxes, preventing heat buildup. Ensure any electrical work complies with relevant building regulations, and consider hiring a qualified electrician for socket installation and safety checks.

