

Last Updated: October 30, 2026
Quick Summary
Plan pantry storage for a sloped ceiling by measuring the slope every half metre and building to the lowest point, then stepping shelf depth down as the ceiling drops. Keep the deepest shelves at the tall end, use pull-out trays on low shelves, and reserve open shelving for eye level.
- Measure ceiling height, depth, angle and run width, then draw the slope to scale on graph paper.
- Stepped shelving suits slopes under 30 degrees, with each shelf set 100-150mm lower than the one before.
- Keep food shelf depth between 250mm and 350mm; deeper than 350mm and the back row disappears.
- Mark where head height drops below 1.2m and make everything below that line closed storage or drawers.
- Seal and insulate eaves voids before fitting shelves, since roof slopes are the coldest, dampest part.
Table of Contents
- Why Sloped Ceilings Are a Storage Opportunity, Not a Problem
- How to Measure and Map Your Sloped Ceiling
- Sloped Ceiling Storage Ideas That Actually Work
- Under Eaves Storage: Turning the Low Side into a Pantry
- Pantry Shelving Ideas for Angled Walls and Low Corners
- Small Pantry Organisation: Making Every Inch Count
- Ventilation, Moisture and Food Safety in a Sloped Pantry
- Book a Free Design Visit for Your Sloped-Ceiling Pantry
- Frequently Asked Questions
Why Sloped Ceilings Are a Storage Opportunity, Not a Problem
Most homeowners see a sloped ceiling and write off the space beneath it. That instinct costs them a room’s worth of storage. At Finest Furniture Studio, we treat an angled ceiling as the start of a design brief, not the end of one. A sloped ceiling is a pantry storage opportunity because the low side creates a natural run of shallow, reachable shelving that flat walls can never offer.
The catch is that standard cabinets waste the geometry. A boxy unit pushed under a slope leaves a dead triangle of air above it.
Here is what we cover below: how to measure the slope, which layouts work, and how to keep food fresh in a low, enclosed space.
How to Measure and Map Your Sloped Ceiling
Start by mapping the slope before you buy or build anything. You need four numbers and a simple paper template, and the whole job takes about twenty minutes.
Measure the ceiling height at the tall wall and again at the low wall. Note the available depth from the back wall to the front edge of where the unit will sit. Measure the ceiling angle with a digital angle finder, or use a spirit level and a protractor. Then record the width of the run.
Draw the slope to scale on graph paper. Mark where head height drops below comfortable reach. That line tells you where open shelving should stop and closed cupboards should begin.
A common mistake is measuring once at the centre of the wall. Slopes often vary along a run, especially in older properties. Take readings every half metre and plot the lowest figure. Consistent precision remains essential throughout the home, as the same logic applied to these awkward angles proves equally vital when measuring for furniture in other irregular spaces.
Sloped Ceiling Storage Ideas That Actually Work
Several layouts suit an angled ceiling, and the right one depends on the slope angle and the depth available.
| Layout | Best for | Typical slope | Shelf depth | Trade-off |
|---|---|---|---|---|
| Stepped shelving | Shallow slopes, long runs | Under 30 degrees | 250-300mm | More shelves, less height per shelf |
| Tall cupboard plus low open shelves | Steep slopes, short runs | Over 40 degrees | 350mm at tall end, 200mm at low end | Needs careful door clearance |
| Angled corner unit | Awkward corners and alcoves | Any | 300mm on the diagonal | Custom build only |
| Under-eaves run | Loft conversions and top floors | 35-45 degrees | Steps from 350mm to 150mm | Limited depth at the far end |
Stepped shelving follows the slope in increments of 100-150mm. Each shelf sits a little lower than the one before, so every jar stays within reach and nothing hides in a dead triangle. Tall cupboards work best where the slope is steep, because the tall section takes the full height at the high end and the low end becomes a bench or a drawer bank.
Door swing and reach need care. A hinged door on the low side will hit the slope, use drawers or sliding fronts there instead. And any shelf deeper than 350mm at the low end becomes a black hole, because you cannot see over the front row. Keep the deepest shelf at the tall end and step the depth down as the ceiling drops.
Before you commit to a layout, mark the line where head height drops below 1.2m. Everything below that line should be closed storage or drawers; everything above it can be open shelving.
For pantry use specifically, the layout has to serve food categories, not just geometry. A stepped run works well when the top step holds backup stock and the bottom step holds heavy tins and bulk bags. An angled corner unit suits oils, vinegars and tall bottles because the diagonal gives them clearance. If you are planning the internals, choosing internal fittings for sloped wardrobes explains how drawer runners and pull-outs behave on a raked frame, the same mechanics apply to pantry drawers.
Under Eaves Storage: Turning the Low Side into a Pantry
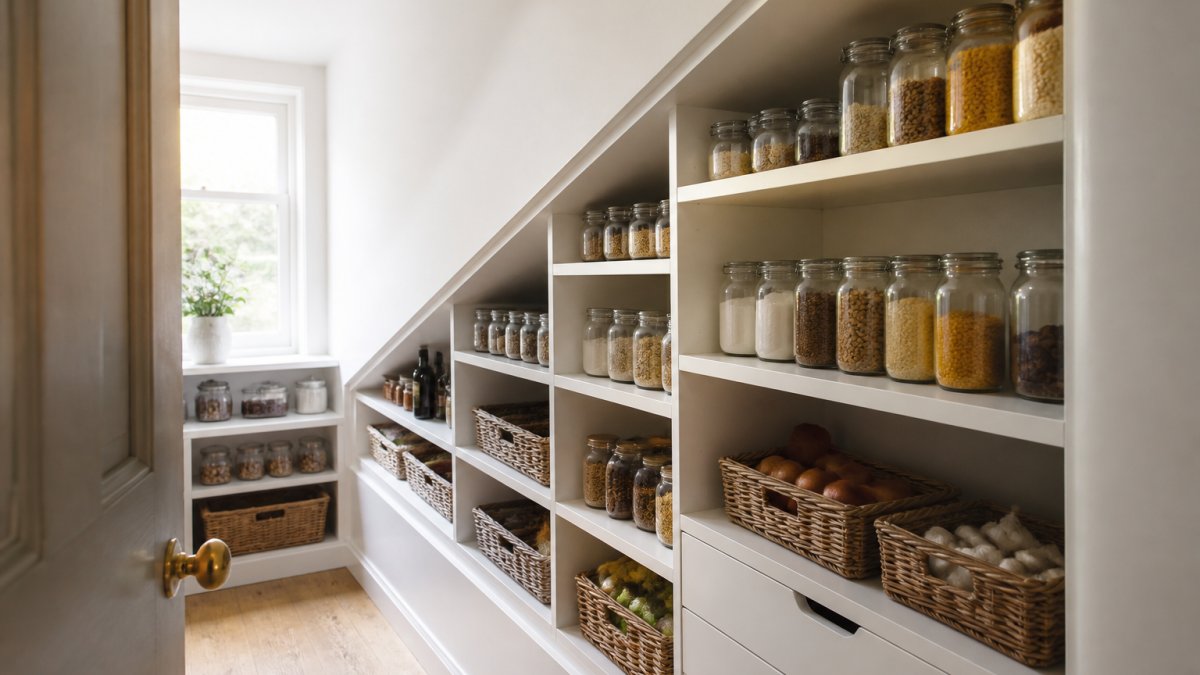
Eaves storage can be a useful pantry space in a home. The low side of a loft or top-floor room usually hides a run of framing with nothing in it. Line that run with made-to-measure shelving and you gain a full food store without losing floor space.
The trick is depth control. Deep shelves at the back become a black hole. Keep the deepest shelf at the tall end and step the depth down as the ceiling drops. For more ideas on working with this geometry, see our guide to creative storage solutions for loft conversion eaves.
Watch out: eaves voids often sit against a roof slope, which is the coldest and dampest part of the building. Seal and insulate before you fit shelves, or your dry goods will absorb moisture.
Pantry Shelving Ideas for Angled Walls and Low Corners
Angled walls and low corners reward a mix of open and closed storage. Open shelving handles daily items at eye level. Closed cupboards take the awkward low triangle where nothing else fits.
A workable shelf depth for food is roughly 250mm to 350mm. Deeper than that and items get lost at the back. Shallower and tins tip forward.
For corners, an angled corner unit can use the diagonal and give a proper turning circle for reach.
Best for: shallow slopes where you want everything visible.
Skip if: the space is damp and unventilated.
Small Pantry Organisation: Making Every Inch Count
Small pantry organisation in a sloped space comes down to four decisions: what goes at eye level, what goes low, what goes high, and how you reach the back of a deep shelf. Get those right and a cramped sloped pantry outperforms a walk-in.
Zone by height, not by food type. A sloped pantry has three usable bands:
- Eye level (roughly 1.2m to 1.6m): daily items, oils, spices, tea, coffee, salt, stock cubes. This is the only band you can scan without stooping or stretching.
- Low zone (below 1.2m): heavy tins, bulk bags of rice and flour, bottles, squash. Keep weight low and forward.
- High zone (above 1.6m, tall end only): occasional items, spare stock, paper goods, seasonal baking kit.
Solve the back of the shelf. In a sloped pantry the low shelves are often the deepest, which is exactly where items get lost. Three mechanisms fix this:
- Pull-out trays on the bottom two shelves, so the whole tray comes to you rather than you reaching in.
- Shallow baskets (no deeper than 300mm) that slide out like drawers and let you see the whole contents at a glance.
- A stepped shelf insert at the back of a deep low shelf, raising the back row so tins and jars are visible over the front row.
Keep shelf depth honest. For food, 250-350mm is the working range. Deeper than 350mm and the back row disappears; shallower than 250mm and tins tip forward when you open the door. On a sloped run, step the depth down as the ceiling drops rather than keeping one depth throughout.
Group by use, not by type. Baking sits together, breakfast sits together, cooking sits together. In a low space you cannot see over the front row, so the grouping has to do the work your eyes cannot.
Label the front edge, not the lid. A low ceiling means you look at the front of a jar, not the top. Adhesive labels on the front edge of shelves and on the front face of baskets keep the whole pantry readable at a glance.
A sloped pantry works when the deepest shelves are at the tall end, the lowest shelves pull out, and everything at eye level is something you use daily. Geometry first, then organisation.
Clear jars and shallow baskets beat deep storage boxes in a low space every time. If you are planning the joinery, our article on custom shelving for awkward kitchen corners covers how to build the diagonal and stepped frames that make these zones work.
Ventilation, Moisture and Food Safety in a Sloped Pantry
A sloped pantry traps air at the low end, and trapped air holds moisture. That is the real risk in these spaces, and it is easy to fix.
Keep an air gap behind the shelving so air can move. Avoid sealing dry goods against a cold external wall. Store flour, rice and cereals in airtight containers rather than open packets. Check the low corner every few months for condensation or damp patches.
The Food Standards Agency guidance on food storage is a sensible reference for how long staples keep and how to store them safely. Ventilation matters more than most people expect: a small vent or a gap under the door makes a real difference.
Book a Free Design Visit for Your Sloped-Ceiling Pantry
Measuring a slope is one thing. Building storage that fits it to the millimetre is another. That is where we come in.
We offer a free design visit, so you can see exactly what fits before you commit. It also helps to know how to budget for custom fitted furniture beforehand. You can also read how a bespoke joinery project is planned before your visit. Our fitting service runs to seven days, and our wardrobes carry a 10-year warranty. Pricing is transparent, with no hidden fees, and you can get current prices from our website.
Get started with Finest Furniture Studio and turn that awkward slope into your best storage.
Frequently Asked Questions
How do you store food under a sloped ceiling?
Start by mapping the ceiling height at the back and front of the space so you know exactly where headroom runs out. Put tall, rarely used items at the lowest end and everyday food where you can reach comfortably. Adjustable shelving and pull-out drawers help you use the full depth without losing items at the back. Keep the lowest section for bulk buys, spare jars or small appliances rather than daily ingredients.
How deep should shelves be in a sloped-ceiling pantry?
Most pantry shelves work well between 300mm and 400mm deep, which fits standard jars, tins and cereal boxes without pushing items out of reach. In a sloped pantry, reduce depth as the ceiling drops so you can still see and grab what is at the back. Measure your tallest packaging first, then set shelf spacing around that. Shallower shelves on the low side stop food disappearing into a dead corner.
Are drawers or shelves better for pantry storage under a slope?
Drawers suit the lowest section because they pull out towards you, so you do not need headroom to reach inside. Shelves work better higher up where you can see everything at a glance. A mix of both is often the practical answer: deep drawers for heavy tins and bulk items at the bottom, adjustable shelving above for jars, packets and everyday staples. Pull-out trays also make the back of deep shelves accessible.
How can you keep a small pantry organised?
Group food by type and use clear containers so you can see what you have before shopping. Keep everyday items between eye level and waist height, and reserve the lowest and highest points for occasional stock. A simple inventory list on the door helps you avoid buying duplicates. Review the pantry every few months, clear out anything past its date, and adjust shelf heights as your shopping habits change.
A sloped ceiling only looks like wasted space until someone measures it properly. If you want a pantry that follows every angle, our team designs, builds and fits it for you. Book a free design visit with Finest Furniture Studio and get a made-to-measure pantry that uses every inch.


